Sunday, December 31, 2023

Quilts in the Rafters

Yesterday the farmer and I switched the quilts in the rafters. He did the height work while I stood safely on the floor and told him what to do.

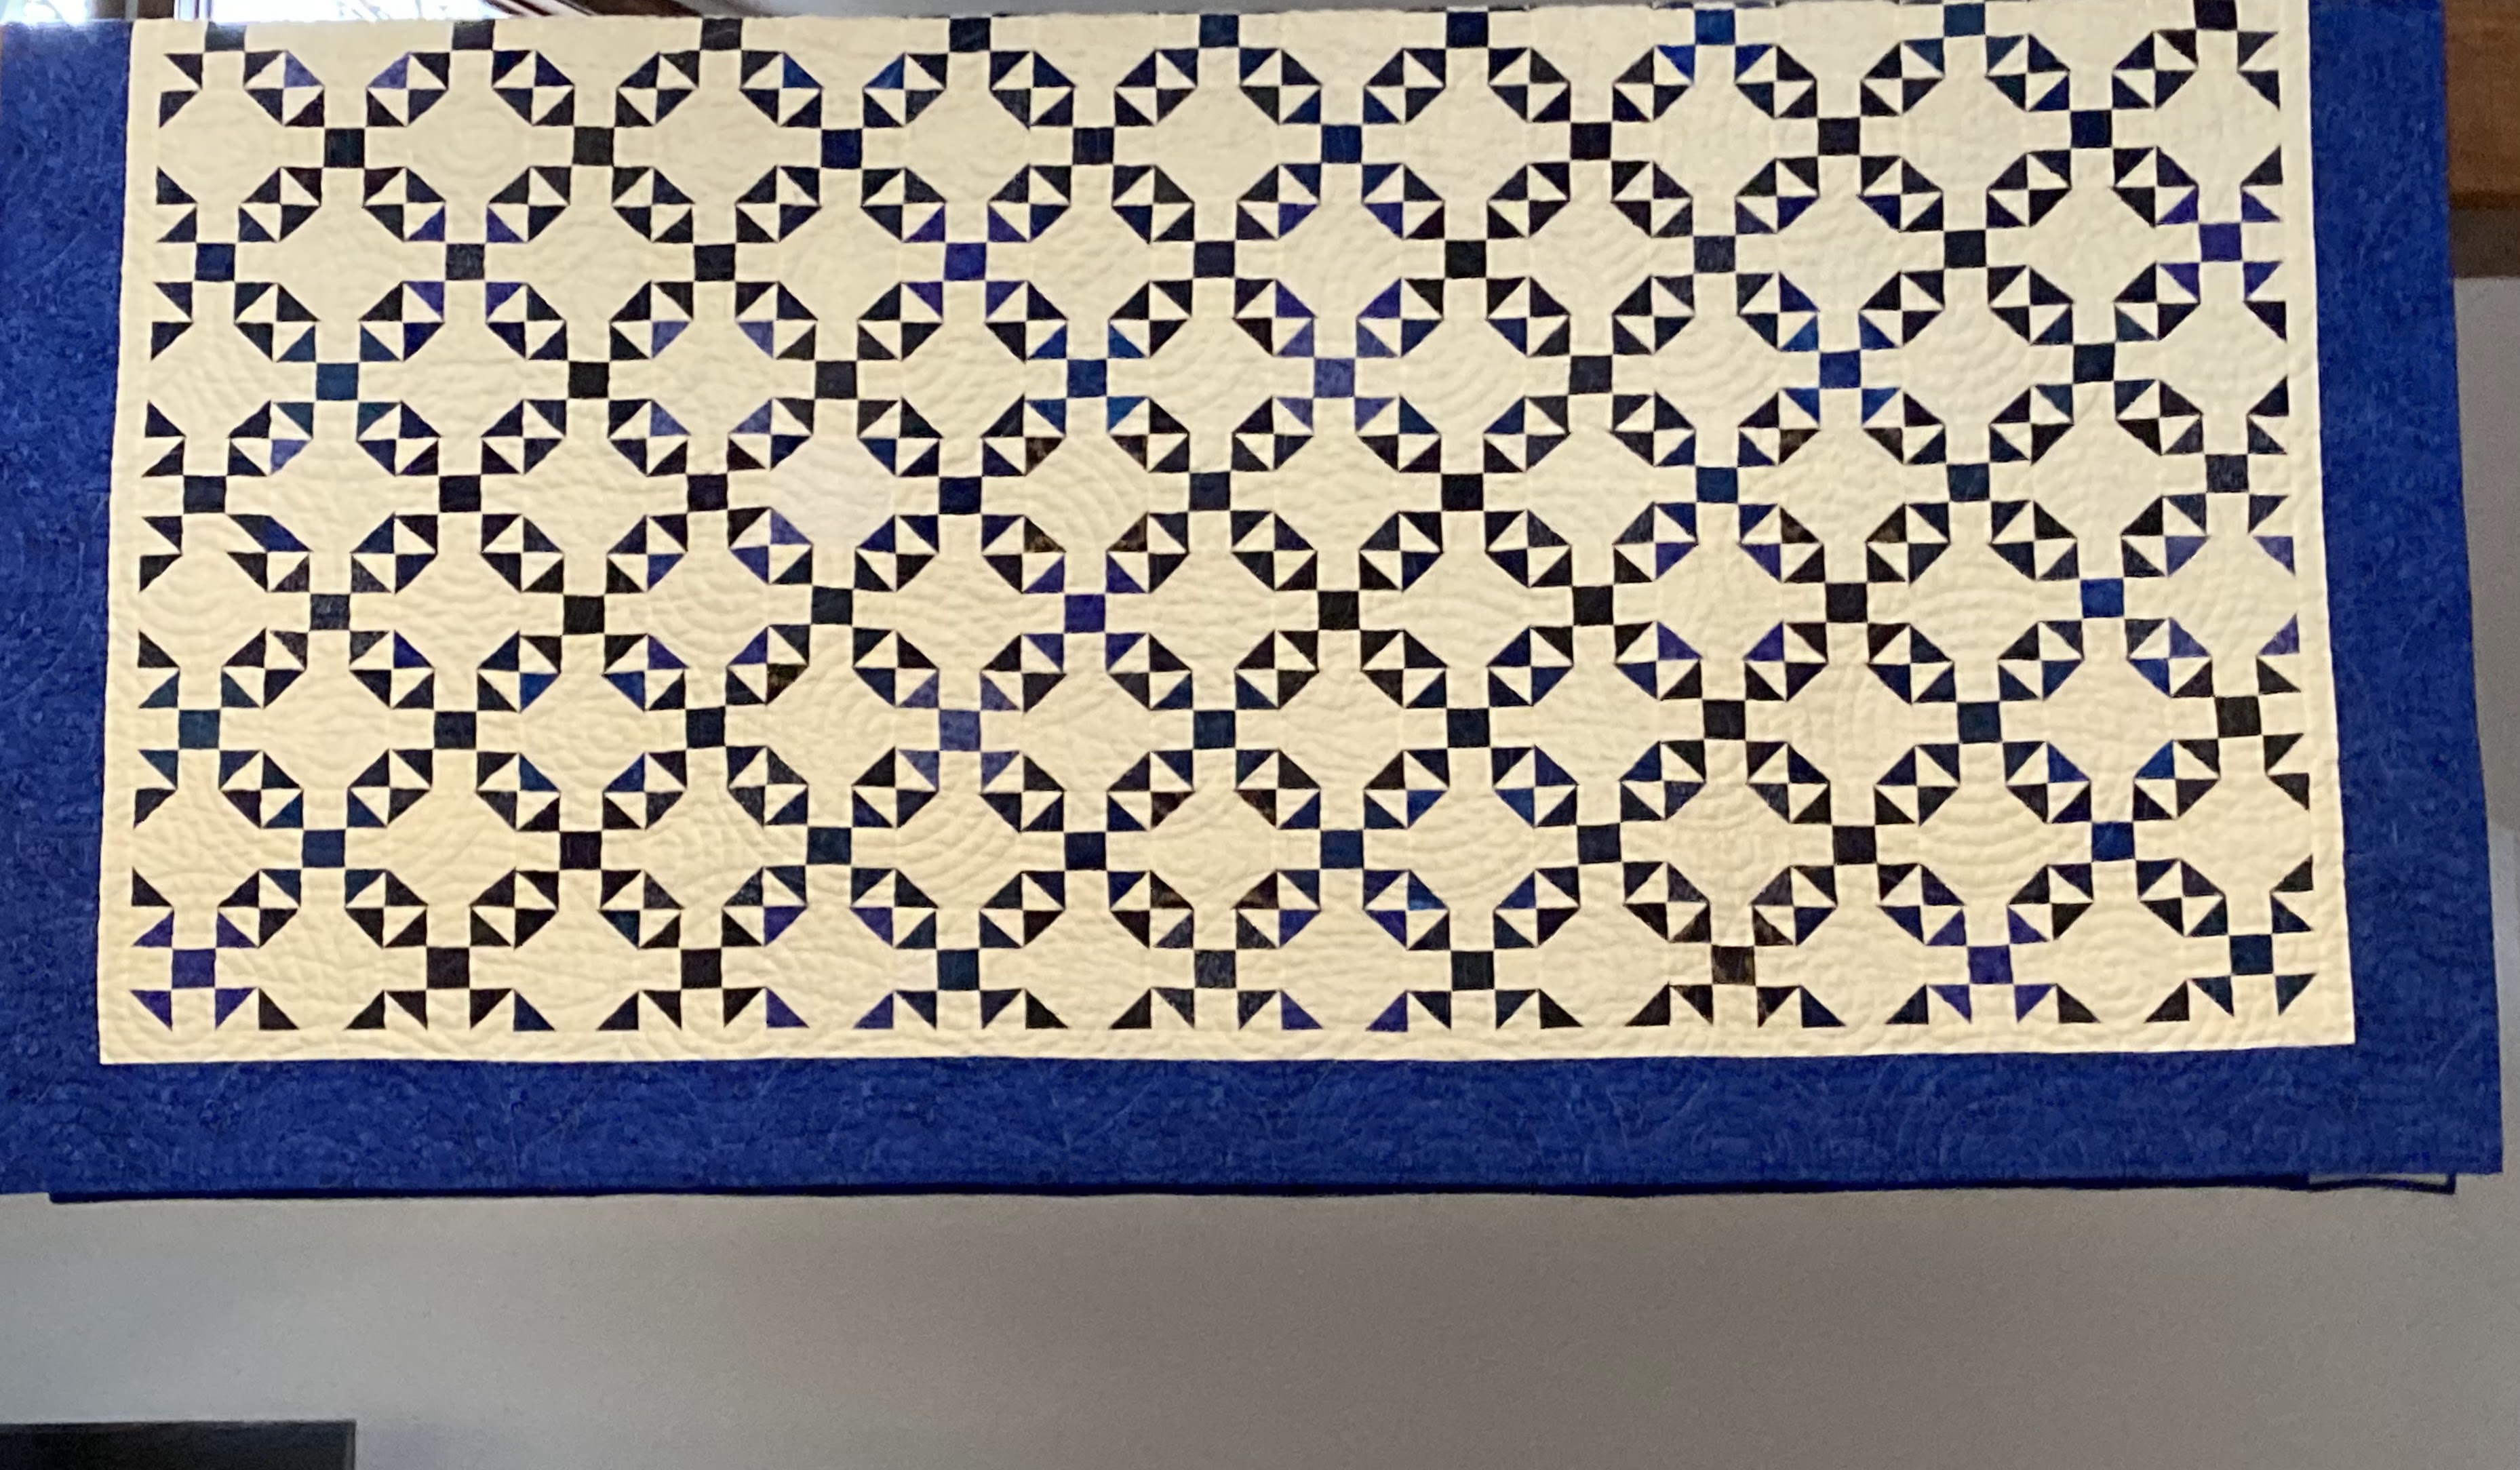
Welsh Beauty is in the dining area. The design of the quilt was hand quilted with blue Sulky #12 weight thread. It didn't show very well on the side toward the south window but I noticed it showed better on the north side. That's the side in this picture.

Welsh Beauty isn't a very showy quilt but it took me so long to hand quilt this quilt, I had to put it on display!

The west side rafter in the living room has blue churn dash. This quilt was also hand quilted and is a reproduction of a quilt made by the farmer's great grandmother.

The east side rafter is displaying Midnight Blues, the last finish of 2023.

In this picture you can see Lady Jane in the background of the dining room.


Here are a few more pictures.

I didn't get those quilts off the back of the couch. They're put away now.

I'm hoping to piece a blue & white wallhanging for the east wall this year. Yes, it's green outside, we didn't have a white Christmas but some of my Christmas cactus are blooming.

I can never make pictures go next to each other, oh well.


I told you I would show you pictures of the ladder we use to hang the quilts. Here they are. And yes, that is a duster he's holding. I figure as long as he's up there, he might as well dust those rafters!


Yes, those rafters are up there. This ladder was left by the former owner so I could wash those high windows! I don't think so.

Linking to Kathys Slow Stitching Sunday, Stitching Stuff, Oh Scrap, Sew & Tell,  Handmade Monday, Design Wall Monday, Craftastic Monday

I have one more picture to show you. Peppermint Pines is now hanging on the hanger into the guest room. It's not the Christmas season but I'm displaying it anyway!


Friday, December 29, 2023

Midnight Blues, the Last Finish of '23

Lori Null finished quilting Midnight Blues in October and returned her to me the first part of November. It took me awhile to bind her which I did by machine. She's the last finish of this year. 

Originally I intended to hand quilt Midnight Blues which is one reason she hung so long in the 'to be quilted' closet. I just couldn't get enthused about the handwork so I finally sent her to Lori for quilting.

The quilting design is Raindrops on Water by the 3 Sisters. The light blue thread quilting thread was perfect! Lori is really good at what she does.

There is a large variety of blues in this quilt, most of them darker blues. There are a few dark medium blues and colbalt blue. No light blues at all. This is why I name it Midnight  Blues, it's also easier to say than shoofly & snowballs.

My last post about Midnight Blues was in May 2020. She has been waiting more than three years to be quilted.

Of course the backing fabric is blue whole cloth. After washing, Midnight Blues measures 86" by 90" which is smaller than I thought he would be. 

My first post about Midnight blues is here and dated July 2019. Here is another link to posts about Midnight Blues if you want to read about the process. I was inspired to make this quilt after reading Jayne's post in December 2017 but my blocks finish at 4.5" instead of 6.5".

The Christmas quilts are coming down from the rafters this week. The next quilts in the rafter display will be blue & white quilts. I'll show you those next week and the ladder we use! Fortunately heights don't bother the farmer like they do me.

Linking to Put Your Foot Down, TGIFF!,  Finished or Not  Friday,  Beauty Pageant, Patchwork & Quilts, Magic Craft

Tuesday, December 26, 2023

Christmas Quilts in the Rafters

I hope you had a blessed Christmas celebration with friends and families.

I don't do much Christmas decorating, several nativities are usually the extent of decorating. We haven't had a Christmas tree in years. No one enjoyed cleaning up the needles and artificial trees just look fake. Some years I have poinsettias but not this year, this year I have Christmas quilts in the rafters.

The front quilt is Peppermint Pines.

Here is a link for the Peppermint Pines pattern.

Behind Peppermint Pines is Christmas Stars.

Here is the link to the Christmas Stars tutorial. And yes, I did hang this quilt so the mistake is on the backside but I've found another mistake on this side facing the front door. It's there in the picture, finding it should keep you entertained if you enjoy puzzles. Oh well, I've never claimed to be perfect.

The green and red chain quilt is Wintersweet.

Here is the pattern link for Wintersweet. I did alter the pattern by finishing the chain out to the edge.

I've realized I like chain quilts!

I'm not able to take a picture of all three quilts at the same time.

Sweet Kisses is on the back of the couch but it doesn't scream Christmas quilt at you. 

The pattern for Sweet Kisses is here.

Linking to To Do Tuesday, Midweek Makers, Wednesday Wait Loss, Put Your Foot Down


Friday, December 22, 2023

Mitering Corners, a Tutorial

Some people are challenged when it comes to mitering corners. I assume there are several different way to miter but this post is about my way. I don't have any problems and I can do a corner in 15 minutes.

I took pictures while I was mitering the corners of Hearts & Wreaths to show you my method.

Step 1. Sew two borders onto the center body. Stop stitching 1/4" from the end. Make sure you backstitch.

This is what is should look like. It's fine to have the borders longer than you need, in fact it's preferable to have a little extra fabric on the end.

Step 2. Fold the center diagonally.  Find the top edge of the border seam, pin the seam.


Step 3. Pin the borders then mark a diagonal line with a Frixon pen by lining up with the fold in the center (this should be a 45* angle). Then measure 1/4" to the left of the bottom and remark your line. I don't know why, I suppose it has something to do with bias, but if I don't sew in 1/4" from the bottom, the corner won't lay completely flat when sewn.

Step 4. Using a basting stitch, stitch along the line, don't backstitch. Turn the border over and check to see that the seam is smooth and not puckery. If you're satisfied, resew the seam using a smaller stitch. If not satisfied, remove the basting stitches and resew.

Step 5. Use your rotary cutter and trim the excess fabric. You could use scissors but if your fabric is a light color, crooked cut edge will show, smooth trims look more professional. Press the seam open.

See how nice and neat the corner looks?

Press the top side also. Now miter the other 3 corners.

I hope these instructions are clear. 

Blogger no longer allows me to reply to your comments on the blog. I don't know why, that's the way Blogger does.

Linking to Put Your Foot Down, TGIFF!, Beauty Pageant, Patchwork & Quilts


Tuesday, December 19, 2023

And Another Comforter Top!

I have another comforter top to show you today but I didn't piece this one. This top was given to be to donated as a comforter but it was too small. I added the outside red borders (which came from the box sent to me last June) to bring it to the size of 63" by 81".


The backing fabric also came from the box. I used some of this fabric before on this little quilt. I thought black would look nice with the red border. That is the fish fabric shown in the lower left side.

It has taken me a year to put those borders on the top, finally finished!


Sunday, December 17, 2023

Hearts & Wreaths

Last Sunday afternoon I appliqued the last leaf onto the border of Hearts & Wreaths.

I didn't think about wind when my son put the display line on the northwest corner of the house. There always seems to be a breeze coming around that side. This was the best I could do  but I assure you the right bottom corner is finished!

I took the flimsy inside the house and laid it on the bed but the borders don't show.

The flimsy measures 80" by 96".

The next step in the process is to mark the quilt for hand quilting. I know how I want her quilted, marking just takes time. Wouldn't having her in the quilting frame by New Years day be an awesome way to start the new year? However February 1 is a much more realistic goal.

I bought the backing fabric several years ago. I may need to piece it but I don't know for sure. I think there is 7 - 8 yards of fabric in this bundle. I bought it before covid off the resale table at retreat because I liked it and thought it was interesting. I had no idea how it would be used

Here is a link to my first post about Hearts & Wreaths back in August 2021. Here is a link to the pattern for Hearts & Wreaths which is found in Quiltmania magazine, issue 138.

Linking to Kathys Slow Stitching Sunday, Stitching Stuff, Oh Scrap, Handmade Monday, Sew & Tell, Design Wall Monday, Craftastic Monday, Magic Crafts, Monday Musings


Friday, December 15, 2023

The Comforter Bash

I took time off from my sewing the Friday morning of the Jane Stickle retreat to attend the Comforter Bash. A total of 412 comforters were completed in two days with 457 people participating. That number does not include all the people who pieced the comforter tops.

I took several pictures to show you different ways to help.

These participants were knotting the comforters. Other people put the comforters into the frames.

These ladies were trimmers. After the comforters are knotted, the batting is trimmed to the edge of top then the backing fabric is trimmed to 1.5".

This is what I did, sewed bindings.


This is a picture of the entryway to the all purpose room. See the black bonnets? I assume the Amish ladies have their name on the inside of the bonnet so they know which one is theirs.

Making comforter tops for MCC was one of the agencies listed in Sarah's Hands 2 Help Comfort Quilt Challenge 2023. Perhaps the comforter top you donated was knotted at this bash!

Linking to Put Your Foot Down, TGIFF!, Peacock Party, Whoop Whoop Party, Finished or Not  FridayBeauty Pageant, Patchwork & Quilts


Tuesday, December 12, 2023

Comforter Tops

I didn't twiddle my thumbs during my unintended October/November blogging break, I focused on finishing projects. 

In August I blogged about the Christmas Stars quilt I was working on and posted this picture.


The post was about Christmas Stars but the pieced triangle in the upper left corner was a long time unfinished quilt (UFQ). That corner guilted me when we lived in the farmhouse and continued to do so in the new house!

After I finished scrappy sprouts, I decided it was time to finish that UFQ and I did!

I had originally planned on a full size quilt but changed my mind and made it into a 60" by 83" comforter top.


I cut squares then recut them on the diagonal so the straight of grain was on the outside long side. I sewed the triangles onto the end of each row. I don't like the idea of adding squares then cutting them off, that means you have bias on the outside edge!


For fun I took a picture of the backside of the quilt.


There were quite a few blocks left so instead of packing them away for someday, I went ahead and pieced another comforter top. There weren't enough blocks to make a 60" by 80" quilt, I settled for piecing the center length at least 80" and used blocks not used in the center for a checkerboard border.


Last June a friend of a friend shipped me a box of fabrics she no longer wanted. She specified that the fabrics be used for charity quilts. The floral fabric used in the borders was from this box. Earlier I had used a larger amount of the same fabric as backing for a comforter, this time it was used in the front of the comforter. The bright colors really bring this comforter to life.

After adding the fabric borders, this comforter measures 60" by 84".


These comforters will be knotted at my church then passed along to MCC to be distributed in one of the many disaster zones in the world or here in the US.


Sunday, December 10, 2023

A Gift From Bethlehem

Last August I posted about a small wool work nativity I wanted to make before Christmas. That was easily done, I finished the stitching in one afternoon in September! 

It's not a complete finish but it is farther along. I thought I had a frame that would fit the stitchery but I don't. I checked at Michael's and they don't have one that is the right size. Hmmm, I'm going to have to improvise but I'll probably wait until next year.

The pattern for A Gift From Bethlehem is available from Litttle Bits by Joan.


I was in Wakarusa last week and took a picture of the flower garden at rest. There is a Nativity in there now.

I also took a long view picture of the Christmas tree in the main square so it's a bit blurry. 

A tree in the center of the main intersection means no left turns and don't try turning it into a roundabout. The police frown on that. 

Linking to Kathys Slow Stitching Sunday, Stitching Stuff, Oh Scrap, Handmade Monday, Sew & Tell, Design Wall Monday, Craftastic Monday, Monday Musings


Friday, December 8, 2023

Christmas Stars

Lori brought 2 quilts that she had quilted for me when she came to our mini retreat. The Christmas Stars quilt came along to retreat with me. 

I sewed the binding Saturday evening and she was a finish by 10 pm! Both sides were machine stitched. When I machine stitch binding, I sew the binding onto the backside then turn to the front for top stitching. Not all quilters do it that way but that is what works for me. When I hand bind, I stitch the binding onto the front then turn to the back for hand stitching. I only hand bind special quilts, quilts that I hand quilt. Machine stitching is so much faster!

The design Lori used was a perfect, it's a holly design with circles, so cute. And the red thread looks so nice!

I thought I had posted when Christmas Stars was in the flimsy stage but I can't find one. The last post I find is when the blocks were arranged on the display floor in August. Those blocks were on the floor for two weeks and I checked them several times looking for mis-sewn blocks.


When I displayed the finished quilt at retreat, someone noticed a block that was incorrect. They asked me if I did that on purpose. No, I did NOT!

That's a bunch of nonsense about Amish women purposely adding a mistake to their quilts. They're just like me, they don't purposely make mistakes, they just happen!

For backing fabric I used the red/beige fabric I had considered adding as a border. You all quickly dispelled that idea, this fabric was perfect for backing. The backing needed to be pieced and I added other Christmas fabric. Years ago I had participated in a Christmas block exchange. These blocks were never used so I added them here.

Here is a closeup of the quilting on white fabric, isn't this design fantastic?!

For now Christmas Stars measures 83" by 89". She'll shrink whenever she gets washed. 

I haven't decided if she's going to hang in the rafters or if she'll be displayed on a bed during the Christmas season.

Linking to Needle & Thread ThursdayTGIFF!, Peacock Party, Whoop Whoop Party, Finished or Not  Friday, Patchwork & Quilts