Block 18 is finished!! This wasn't a difficult block to piece, just extremely boring but I kept on sewing and finally completed her. There is a total of 233 pieces in this 6 1/2" block (6" finished). Thankfully there won't be anymore block with this huge number of pieces.
I decided to keep things simple and just used 2 fabrics. With pieces this small, I was afraid the block would be a blur if I added other fabrics.
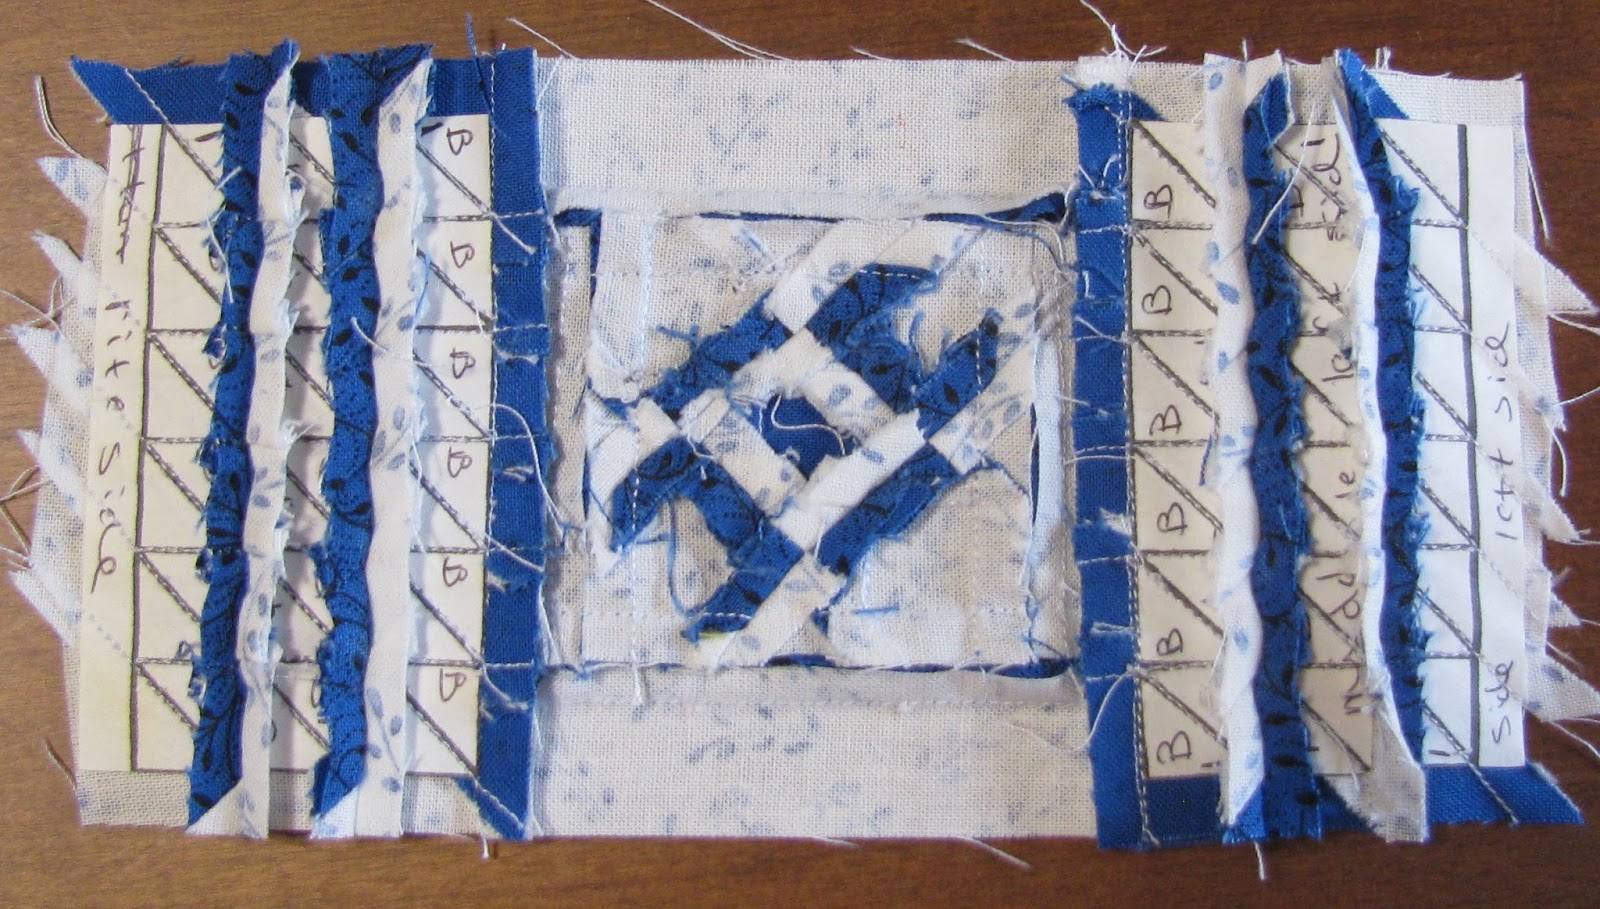
First I pieced the center star. Notice the ruler, it took me 1 1/2 hours to piece this star and it is only 1 1/2"! The complete center is 3 inches finished.
Next I pieced the two small side HST's. They don't lay flat very well.
The view from the front.
The final HST's. See all the papers on the back? The seams are supposed to be pressed open.
And the front view.
All the blocks in this row have been completed and sewn together with the sashing in between the blocks ready to be attached to the body. But not yet.
The body of my uncompleted Nearly Insane hangs on my display wall. I kept looking at her and thinking there is a block that just does not fit in with the rest of the blocks in the quilt.
All the other blocks are either a star or a pieced block. This block was just too random. Maybe the problem was me, I didn't organize the fabric right.
Anyway, I decided to design my own block and this is what I came up with.
I think the blocks that have rows of flying geese are my favorite blocks so I pieced another variation of the geese.
Row two churn dash blocks and white squares are quilted.
The quilt is a rectangle with the blue blocks 7 by 8. In between the churn dash blocks are the 7 1/2" white squares, 6 across and 7 vertically.
I marked the squares in a rectangle. All the white squares in the outside rectangle were quilted like I showed you last week. This week I've started quilting on the white squares in the next inside rectangle.
There were 4 with the newest stencil and two with the outside stencil.
I don't know if this makes any sense to you. I guess you'll have to wait until the quilt is completely finished to see what I'm talking about.
When I've rolled the frame enough to start quilting the next row of white squares, I will have 3 different quilting designs in that row.
I've been knitting a dishrag in the evenings but got tired of that. Then I remember a project I pieced several years ago that needs hand sewing to finish it. Square blocks were folded in half then sewn into the quilt. I need to hand sew the edges of these triangles into curves. These blocks will turn into tulips.
The name of the quilt is 37 North. My friends Janis and Edith used to have a quilt kit business. They thought up patterns and made kits to go with the patterns. They designed this quilt on the way to a retreat in Michigan. They were on road 37 headed north so that is what they named it. I think I will call it the tulip quilt.
It is going to take me awhile to get these triangles turned into curves. I had forgotten about this wallhanging so I'm glad to be pulling out a long time UFQ.
Linking to Kathy's Slow Sunday Stitching, Quilting is More Fun than Housework, Love Laugh Quilt, Show & Tell Monday With Bambi, Fiber Tuesday, BOM's Away, Esther's Wednesday WOW!, Let's Be Social, My Quilt Infatuation, Finished Or Not Friday, Crazy Mom Quilts, Confessions of a Fabric Addict
I've started piecing another row of Nearly Insane last week and made good progress.
This row contains 13 blocks including the infamous block 18! Two of the block are the half blocks for the sides of the quilt. I won't have to piece anymore side blocks, these were the last ones needing to be pieced.
I found this piece of blue floral in my stash. It was used right away. I don't have a lot of small blue floral prints.
Here are the other blocks.
These blocks were both very easy to piece.
These blocks were fairly easy too. Obviously the bottom block was more time consuming than the top one.
I'm changing some of the blocks to suit my preference and both of these blocks had pieces that were rearranged. I like my blocks symmetrical.
The bottom block was the most challenging block to piece. It didn't have the most pieces but she caused me some stress.
These three blocks were fairly easy to piece. I've got the flying geese piecing down now and can whip them out pretty speedily. The important thing is to make sure you over size your pieces. It make the piecing so much easier.
The block with the most pieces was this beauty, #42. She has a total of 120 pieces, more flying geese!
There is one more block to be pieced in this row and I'm giving myself plenty of time for her completion. With the few changes I made, block 18 contains 233 pieces. She should be completed by next Wednesday.
Sometimes I think about Salinda Rupp making the original quilt. I don't know if she hand pieced the blocks or sewed them on her machine or if it was a combination of both. I wonder how many years it took her to make this quilt.
I started piecing this quilt as a challenge and I am enjoying myself. I can't imagine piecing these blocks though without foundation paper piecing them.
Linking to - Fiber Tuesday, Sew Some Love, Esther's Wednesday WOW!, Sew Fresh Quilts, My Quilt Infatuation, Finished Or Not Friday, Confessions of a Fabric Addict, Show & Tell Monday With Bambi
The first row of white squares has been completed and a start has been made on the 2nd row of churn dash blocks. I don't know why, but I always like to quilt the border edges of the row first, then quilt the center part. Like the first row, this row will be stitched in the ditch then the curves in the HST's will be quilted.
Sorry, I forgot to take a picture of the white squares before I rolled. I'll do better next time.
Last week someone asked me how long it took to quilt one of the white squares and I told them maybe an hour? I timed it and it was an half hour.
I haven't done a thing about prepping the applique for the borders for the Pastor's Attic quilt. I started piecing another row of Nearly Insane last week and blue fabrics are all over the cutting table. Pastor's Attic is just going to have to wait until I'm in the mood for him.
Linking to - Kathy's Slow Sunday Stitching, Em's Scrapbag, Love Laugh Quilt, Show & Tell Monday with Bambi, Fiber Tuesday, Esther's Wednesday WOW!
While I was working on the scrappy star charity quilt several weeks ago, I sewed the 16 blocks for the center of another star. I decided I was tired of sewing stars, so I put it away for a couple weeks.
After I finished sewing my RSC blocks, I pulled the fabrics needed to finish this top. She is quilted,measures 43" square and is ready for donation. She will be going to a local charity in my area.
Sarah, from Confessions of a Fabric Addict, is organizing Hands2Help, a Charity Quilt Challenge. She has organized this charity drive for several years. If you are interested, check out her post.
If you aren't interested in Sarah's challenge but have quilt tops to give away, you might want to send them to Jo Kramer. You send her the tops and she'll quilt them for charity. Click here for the details.
With the finish of this little quilt, mom's purple box is empty. What few pieces were left have been cut into 5" squares. I did add some of my fabrics to the mix.
Linking to - Fiber Tuesday, Sew Some Love, Building Blocks Tuesday, Esther's Wednesday WOW!, Sew Fresh Quilts, My Quilt Infatuation, Finished Or Not Friday, Crazy Mom Quilts, Confessions of a Fabric Addict
The hand quilting on my blue churn dash quilt continues and the first churn dash row is completed.
The churn dashes are stitched in the ditch, then I'm adding curves to the sides of the HST's.
The inset triangles are quilted with a different design. It does leave a slight unquilted area along the edge but I think it looks fine. I'm not a person who thinks a quilt needs to quilted into submission.
In between the churn dash blocks are white squares. There are six squares in a row. Two of the squares have been quilted. If I quilt a square a day, this row will be finished by next Sunday.
I was asked by several commentators what do I use to mark the quilt.
The main marking was done before I put the quilt in the frame with a light silver marking pencil. Years ago, my mother gave me a box of Berol Verithin #753 silver pencils. I've used these pencils for years and they are down to the nubs.
Two years ago I purchased a box of Prismacolor Verithin Agent Metallique #753 Metallic Silver pencils at an Amish fabric store. At fabric stores I do see individual silver marking pencils for sale, but it takes several pencils to mark a quilt. I don't like to stop to resharpen a pencil when I'm marking the quilt. I sharpen many pencils so I can mark the whole quilt without stopping. The silver pencils work well on dark fabric too.
After the quilt was in the frame and I had quilted the white border, I decided to add the straight lines. The same with the curves in the HST's. To mark on the white fabric, I'm using fine point, water soluble blue marking pen which was purchased at JoAnn Fabrics. I don't mark heavily with it, just a faint line is enough for me to see to quilt. After the quilting is completed, I spray the quilting with water. The blue marking disappears.
The blue fabric is marked with a Sewline white chalk mechanical marking pencil. The chalk marking wears off as the quilting continues. The white marker is not good for marking a whole quilt before quilting, the marking will wear off. Trust me on this, it happened to me.
I could have used the silver pencil to marked the additional lines for both the white and blue fabric, but I find it difficult to mark the quilt with the pencil when the quilt is in the frame.
Most of the pictures in this post were taken when it was dark outside. Some of them are not the greatest pictures.
Linking to - Kathy's Slow Sunday Stitching, Quilting is More Fun than Housework, Em's Scrapbag, Love Laugh Quilt, Show & Tell Monday with Bambi, Fiber Tuesday, Esther's Wednesday WOW!, Crazy Mom Quilts
Red is the official color for the March RSC. I won't bore you with details, my RSC blocks for this month are green. When the month for green rolls around, I'll do red then.
Eight lovely green stars. These cuties will finish at 4".
Fifteen 4-patch blocks. They will finish at 8".
Last month I had shown several ways to lay out these blocks. If I understood some of the comments correctly, some people thought I had all the blocks I needed.
No, these blocks will be for a king sized quilt. I'm going to need lots of them.
Linking to - Fiber Tuesday, Sew Fresh Quilts, My Quilt Infatuation, Finished Or Not Friday, Crazy Mom Quilts, Confessions of a Fabric Addict, Scrap Happy Saturday
The hand quilting on my churn dash quilt is moving along.
I've stenciled a father design on the white border.
I've added a double straight line to hold down the loose fabric. I'm pleased with the way she is looking.
I finished quilting the white border section Saturday afternoon. I've rolled and will be working on the next blue square/square border.
I've had several people ask about the dishcloths I knit. I use Lily brand Sugar 'N Cream cotton yarn. In my corner of the world, yarn costs less at Michael's than JoAnn Fabrics. A variegated skein will knit 1 cloth with some yarn leftover, the solid colored skeins are slightly larger. I like to knit the leftover yarn then finish with a coordinating solid colored yarn, but that is my personal preference.
Here is a link to many different patterns for knitted dishcloths. There is also a pattern on the backside of the label on the skein of yarn but the pattern can be for any project, not necessarily dishcloths.
There are also free patterns on Ravelry.
I like a very simple pattern so I can knit without thinking. I use a size #6 circular knitting needle, I like my dishcloths tightly knitted. I never knit a swatch to check the gauge for dishcloths.
This is the pattern I learned to knit with. It calls for a #10 circular needle. Cast on 4 stitches. *Knit(K) 2, Yarn over (YO), knit across. Repeat * until you have 45 stitches on the needles. **K1, K2 together, YO, K2 together, K on across. Repeat ** down to 4 stitches. Bind off.
I used that pattern for years until I was sick very tired of it. I also started using the smaller needles after the first few dish cloths.
I don't know where I found the pattern I am using now, I do know it was a free pattern from where ever I found it. Seed Stitch Dish Cloth - With a size #6 circular needle cast on 40 stitches. Row 1 & 2 – knit. Row 3 & 4 – Knit 2 *K1 P1 repeat from * across
to last 2 stitches k2. Repeat rows 1 – 4 for pattern until measures 9”
(same as bottom edge), ending with Rows 1 & 2. Bind off.
I never thought people would be asking me about knitting! I see so many beautiful project on line. If I wasn't so addicted to quilting, I think I could really get into knitting.
I have another quilt to show you today. As I have told you before, every year the Maple Leaf Quilt Guild donates a hand quilted quilt to the Michiana Mennonite Relief Sale. I had been helping to quilt this year's quilt, Sweet Surrender. She is finished and was displayed at the last guild meeting. I forgot to take my camera but Edith sent me some photos. I had planned to take some close up pictures of the quilting but that's the way it goes.
The members all helped make the blocks, either by appliqueing or piecing, something for every preference. There were extra pieced blocks not needed for the front so Edith sewed them into the backing. It was not easy to quilt with them on the bottom, but it looks lovely when finished. She also made the special block in the top left corner to be used as the quilt label.
I have to confess, when she said this was going to be a scrappy quilt, I was concerned how it was going to look but it has turned out beautiful. We were provided the red fabric that is the red triangles in the bottom of the pieced blocks. All the other fabrics, including the backing for the applique blocks, came from the individual members stash. Edith sewed the triangles together, pieced and appliqued the border. She has done our guild proud!
Linking to - Kathy's Slow Sunday Stitching, Quilting is More Fun than Housework, Em's Scrapbag, Love Laugh Quilt, Show & Tell Monday, Katie Mae Quilts, Building Blocks Tuesday, Fiber Tuesday, Sew Some Love, Esther's Wednesday WOW!, Sew Fresh Quilts, My Quilt Infatuation, Finished Or Not Friday, Crazy Mom Quilts, Confessions of a Fabric Addict