Sunday, September 29, 2019

Quilting & Applique

I've started quilting the inside of Floral Triangles. I'm using the gray/silver #12 Sulky thread and quilting 1/2" from each side of the diagonal lines. The quilting goes fairly fast. 

Stitching in the ditch around all the applique is going to slow me down. I'll use white YLI hand quilting thread for that. I want to outline the applique, not necessary for colored thread to show.


This week was busy with non quilty things. All the hand quilting I accomplished was this little 12" section.

Now you can see I'm stitching on each side of the diagonal seam line but NOT in the ditch of the seam line. I like it!


My hand quilting is going slowly. One of the reason for the slow quilting is the center medallion for the Stars Around the Garden quilt. I started the applique several weeks ago while piecing the blocks but piecing goes faster than applique, at least for me it does.


There are 50 or 60 leaves that will be appliqued once the flowers are finished. This end has the finished flowers.
I'm enjoying the applique process since I haven't appliqued in quite awhile.

The background fabric looks white but it isn't. The fabric is a cream with a subtle beige flower design.

Hand Quilt Along is an opportunity for hand quilters and piecers to share and motivate one another. We post every three weeks, to show our progress and encourage one another.  If you have a hand quilting project and would like to join our group contact Kathy at the link below.

KathyMargaretEmmaTracyDebSusan,  Nanette,  EdithSharonKarrinGretchen and Kathi


Linking to Kathy's Slow Sunday Stitching, Oh Scrap, Bambi's Show & Tell MondayMonday MakingDesign Wall MondayBOM's AwayMoving It Forward, WIPs On Wednesday

Wednesday, September 25, 2019

Stars Around the Garden

I've started a new quilt which will be a donation flimsy. The pattern I'm using is called Stars Around the Garden. I'm using older fabric from an Edyta Sitar line called "Snowbird". I pulled additional fabrics from my stash, several medium browns and a couple medium and dark blues, just to give more contrast.

I've completed 9 blocks so far.


#1 This block is made with only fabrics from the fabric line.


#2 This block has some of the added fabrics. 

The brown/blue flying geese are the fabrics I added. I think they blend well.

The blue in the corner HST's is from the fabric line.
#3 Again I added the same brown and brighter blue that I used in block 2.


#4 The corner squares of this block were supposed to be different. The triangle piece was to have been blue but I mistakenly cut background fabric. I just used those triangles and made the block unique. 

If I hadn't told you, you would have never noticed the difference!


#5 These fabrics are from the original line.
#6 Added a different brown which looks good with the light blue of the original line.
#7 Again, a different brown.
#8 The light blue is from my stash.

I never noticed the Whoops! until I took this picture. I'll be taking that bottom row off this evening then resewing. This is an easy fix.

Sometimes I just get in a hurry when I have a block close to competition.


#9 The only fabric from the original line is the background fabric. The blues look fine to my eye but that brown is yuck! 

This block will definitely be reworked. It will be easier to make a whole new block.

If you looked at the pattern on the link above, you saw there is a medallion center. I'm working on the applique but you'll have to wait until Sunday to see my progress.

Linking to Midweek Makers, Needle & Thread Thursday, Peacock Party, Confessions of a Fabric Addict, TGIFF!, Brag About Your Beauties, Finished Or Not Friday

Sunday, September 22, 2019

Slow Quilting Floral Triangles

Last week I quilted the 2" finished patchwork border. I'm using Sulky #12 variegated gray/silver thread.


I took a close up picture of the quilting in the flower border, you can see the green thread but I don't think you can see the difference of the greens used on the vine and the outside of the leaves.


This week I want to get the top edge of the narrow white border quilted. Quilting the edge shouldn't take long, maybe I'll start on the center section too, at least the red triangles.

You can see white chalk quilting marks on the red fabric. 

Linking to Kathy's Slow Sunday Stitching, Oh Scrap, Bambi's Show & Tell MondayMonday MakingDesign Wall MondayBOM's AwayMoving It Forward, WIPs On Wednesday

Thursday, September 19, 2019

Lucy Finish

My Patchwork of the Crosses designed by Lucy Boston is finished! I had to force myself to finish this project. I did NOT hand quilt, I actually machine quilted the little quilt with my sewing machine. She's not perfect but she is finished!!


I'm not a table runner sort of person, for now this is hanging on the wall. It is pretty and I do like it now that it's finished, but I never want to make another one.


My original plan was to quilt around the flowers which is the way the white connecting fabric was quilted.


But I didn't like the way that fabric puckered so all the rest of the blocks are stitch inside each elongated hexie. The addition stitching made the hexies lie flat which is what I wanted.


Colored thread was used for the quilting. You don't really see it on the front but the back of the quilt looks very interesting.


For the outside border, I quilted a Baptist Fan design. This little quilt measures 29" by 40-1/2".

Linking to Free Motion MavericksPeacock Party, Confessions of a Fabric Addict, TGIFF!, Brag About Your Beauties, Finished Or Not Friday, Oh Scrap


Wednesday, September 18, 2019

Midnight Blues

As you all know, Bonnie Hunters leader & ender project for 2019/2020 is the shoofly block. She gives a very detailed tutorial how to make the blocks.

This was the incentive I needed to start piecing shoofly blocks but I'm not piecing my blocks the way Bonnie describes. I'm doing them my own way which works for me!

I like the precision of foundation paper piecing so I've made my triangles with 1-1/2" finished Thangles papers. I also didn't make the center block larger. In my block, each of the 9 sections is the same size.


I needed a total of 162 shoofly blocks which means I needed 648 HST's. Got them done but piecing the blocks had to wait because August was just a busy month. 

It's September now and the shoofly blocks are finished, all 162 of them.

Now I need 161 snowball blocks but I'm not piecing those yet. I think piecing those blocks sound like a good mindless sewing project to take along to retreat in November.


The cream squares in the above picture are for the snowball blocks, the squares for the flippy corners are cut. I'll work on marking a diagonal line on the back of those so they're ready to sew at the retreat.


Earlier this summer I did piece 4 snowball blocks to see how they looked with the shoofly blocks. Before I cut the flippy corners off the snowball, I sewed a 2nd seam. I cut between the seams, now I have these tiny little HST's. I'll wait to press then until after all the corners have been sewn, then they have to be trimmed. I have no idea what they'll be but I know this, it will be very small. 

I guess Judy Hanson from Small Quilts & Doll Quilts is making an impression on me. Judy also attends the Jane Stickle quilt retreat. Over the years I have gifted her with many tiny pieces. Her small quilts are so cute!

I'm using mediums and dark blues for this quilt which are already in my stash. I've used at least 25 different blues but so many of them are very dark deep blue/black so I've named this quilt Midnight Blues. Midnight Blues is a lot easier then to say shoofly & snowballs.

I first posted about my project in July. If I make this quilt like I'm planning now, there will be an applique border included or maybe I'll embroider the border . . . I'll decide when the center is pieced.

I know my project isn't a leader & ender project like Bonnie's but, my quilt, my way.

Linking to Midweek Makers, Needle & Thread Thursday, For the Love of Geese, Peacock Party

Sunday, September 15, 2019

Quilting Floral Triangles (Formerly Know as Sweet Surrender)

First of all, I've never like the name Sweet Surrender. I think a quilt name should reflect the quilt somehow and Sweet Surrender just doesn't do it for me. I've renamed my quilt Floral Triangles, not a fantastic name but it truly reflects this quilt.

Next item, the disclaimer I need to post so I don't get bombarded with questions about the pattern.

Because someone always asks, I no longer have the Sweet Surrender pattern. I do NOT know where you can buy the pattern.  Sue Cody is the designer and owns the copyright on the pattern. She is no longer releasing it for publication. As far as I know, it is not available anywhere. Sorry, but that's the way it is so please don't ask me where to buy the pattern. Do your own search.


 Now, onto what this post is really about, quilting Floral Triangles!

I finished the bottom floral border. I really love the way this border looks, the colored Sulky threads look lovely. The stem and the inside of the leaves are quilted with a variegated green thread and the outside of the leaves is a more bright spring green.

The yellow flower centers were a problem. I've tried several different yellows and have finally settled on a brownish-gold thread. So, the bottom border has 4 different center colors until I finally found the right one. No one will ever notice though. I know, the colors don't show in this picture, I'll try to do better next week.

Did you notice the cloth on the back of the quilt? That's a cover I keep over the quilt when I'm not quilting. The room has windows to the south and west. Also we have the screened windows open during the summer, this way no dust lands on the quilt.


The pictures are a little dark, I took them in the early morning before the sun was very high. There's too much glare when the overhead light is on or the room is flooded with sunshine.

I need to get back into the fall/winter routine of quilting every evening but that hasn't happened yet so the quilting is going slow for now. 

I had said in the earlier post about this quilt that I used a Hobbs Tuscany Collection wool batt for this quilt. Connecting Threads has all their batts on sale now for 30% off, including the Tuscany Collection, just in case you're interested.

Linking to Kathy's Slow Sunday Stitching, Oh Scrap, Bambi's Show & Tell MondayMonday MakingDesign Wall MondayBOM's AwayMoving It Forward, WIPs On Wednesday

Wednesday, September 11, 2019

Summer Sun, Spring Splash

The Summer Sun, Spring Splash baby quilt has been quilted.
I ran across this pattern on another blog which linked back to the original pattern which was designed by Shelby Morris. I changed the name of my quilt to Summer Sun since I was making my quilt in the summer.

My quilt measures 40" square. I quilted her using Isacord polyester thread. This is the same thread I used to quilt the sky on the tractor quilt I made a grandson several years ago.

The quilting was completed with my sewing machine. I wanted the center star to be the focus of the quilt so I chose X quilting for the center. The lines are 1/2" apart. After that was completed, I stitched in the ditch around the center square.


Next was the checkerboard border. I had decided I was going to be brave and adventurous and do orange peel quilting on these blocks.

This was my first attempt at this design, I've always stuck with easy and simple before. Some of the orange peel blocks look pretty good, but some of them don't. If I were a perfectionist, which I'm not, I would unstitch those not so perfect curves and resew them. Fortunately I'm not a perfectionist, I'm more of a finished is better than perfect sort of person.

The above picture shows the true color of the yellow. When I take pictures of this fabric outside, it looks lighter colored and washed out.


I did see improvement in my stitching as I went along. I don't know how soon I'll quilt more orange peels but at least I was brave and tried them.
For the outside border I went with simple straight lines. I always like the simple design they make when the lines cross in the corners. I did take a picture of the corners from the front but it turned out blurry. You can kind of see the corners in the photo below.

I used the leftover fabrics on the back, the blue I've had for, oh, maybe, 15 years! The 9 patches on the back are from the leftover strips from the checkerboard border.
This was a fun, fairly fast little quilt to make. I recommend using this pattern for a small baby quilt or a wall hanging which was what the pattern shows. 

However I can see piecing several of stars for the center of a larger quilt.

Linking to Needle & Thread Thursday, Let's Make Baby Quilts, Peacock Party, Confessions of a Fabric Addict, TGIFF!, Brag About Your Beauties, Finished Or Not Friday, Oh Scrap

Sunday, September 8, 2019

Happy Little Things

I actually started a BOM in August called Happy Little Things with Jacquelynne Steves. I had planned to use leftover fabrics from Metro Rings, but then I saw the red & white block Leeanne made and changed my mind. My block though is going to be in blue, yellow and white.


 Here is the block I made for August . . .


And September's block.

For variety, I turned this flower a different direction.


I've embroidered 2 more blocks of alternate designs which are available on the website.


They're slightly blurry, sorry!

I'm always using white backgrounds for embroidery. I decided to be brave and bold and use a white with a gray print.


You can choose how you want to make your block, applique or embroidery. Instead of a quilt, Brenda made the blocks into pincushions which are really cute!

I had originally planned to make 6 blocks for my quilt but I've since changed my mind. There will be more blocks and I'm not going to finish my blocks the way Jacquelynne has designed. 

In case you're wondering how Sweet Surrender is coming along, I haven't quilted a single stitch all week! I did check to see if the quilting fairy stopped by during the night to put in a few stitches, sadly, no. Hopefully this week won't be as busy as last week.

Linking to Kathy's Slow Sunday Stitching, Oh Scrap, Bambi's Show & Tell Monday, Monday Making, Design Wall Monday, BOM's Away, Moving It Forward, WIPs On Wednesday

Wednesday, September 4, 2019

Summer Dreams, Bright Hopes

The Summer Dreams or Bright Hopes quilts are quilted. I quilted them on my sewing machine with very simple quilting.


The quilting consists of stitch in the ditch along the seam lines between the blocks horizontally and vertically. Then I stitched diagonally both directions. Plain white thread was used on the front and backside.


I love this little bird fabric so for one of the quilts, I added several blocks of fabric instead of a pieced block.

You don't really notice the fabric blocks though. Look at the side by side pictures, the squares really blend in.

I did make a mistake when cutting some of the rectangles for the blocks. My rectangles weren't quite wide enough, easy to fix though. I just trimmed another 1/2" off, sewed fabric strip along that edge then then trimmed to size. Go ahead, enlarge the photos, see if you can find the fix. I think there were 4 blocks I needed to do this to.


They both measure 48" by 62", a little big for a crib quilt but perfect for a youth bed. I always liked crib quilts for my babies bigger than most people. When I was up in the middle of the night, especially in the winter, I liked the quilt to cover me too!


In the summer of 2018, I was organizing my fabrics and I came across cotton/poly fabrics I used when I sewed little granddaughter dresses. I thought these fabrics would make good backings for quilts. These fabrics are what I used on the backs of Summer Dreams, they have the soft, low volume look.


I had planned to use the bottom red/yellow/pink/blue stripe for the binding of the quilts but I didn't think it looked right so I went with the lavender/aqua fabric. 

What I like about the stripe I did use is the lines are printed diagonally on the fabric which gives the illusion that I used bias binding.  

I love the look of these quilts, they're so joyful and springy looking!


There may be more low volume quilts in my future. 

One of the blogs I enjoy reading is Quilted Twins. She is one of the most prolific quilters whose blog I read. She recently had this post highlighting some of the low volume quilts she's made. (While you're on her blog, check out her free quilt patterns)

The Bright Hopes pattern was so simple and easy to make. The original pattern was published on the Red Pepper Quilts blog. She has a tutorial for piecing the blocks. Yes, there is a partial seam but that's not hard. She also has listed the sizes to cut for different sized blocks. I see making more of these blocks, not necessarily in low volume fabrics, in the future.

Linking to Free Motion MavericksNeedle & Thread Thursday, Let's Make Baby Quilts, Peacock Party, Confessions of a Fabric Addict, TGIFF!, Brag About Your Beauties, Finished Or Not Friday, Oh Scrap

Sunday, September 1, 2019

Sweet Surrender in the Frame!

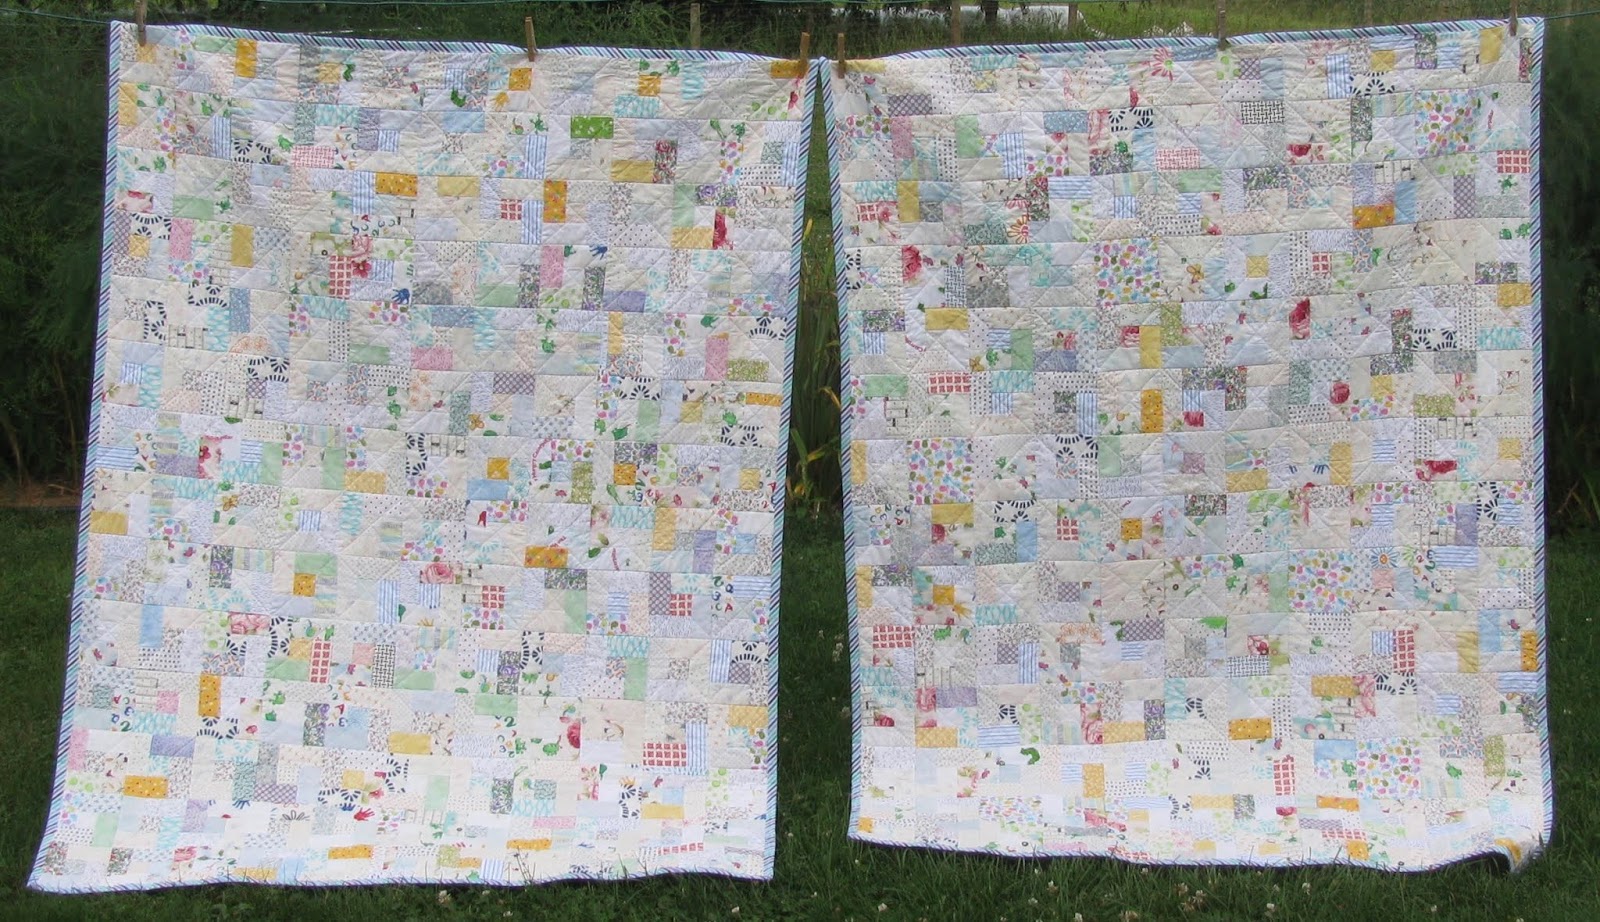
One of my August goals was to get Sweet Surrender marked and into the hand quilting frame. I did meet that goal and the quilting has started.


Because someone always asks, I no longer have the Sweet Surrender pattern. I do NOT know where you can buy the pattern.  Sue Cody is the designer and owns the copyright on the pattern. She is no longer releasing it for publication. As far as I know, it is not available anywhere. Sorry, but that's the way it is so please don't ask me where to buy the pattern. Do your own search.


This is a large quilt, 92" by 104". I made my quilt larger than the original pattern. 


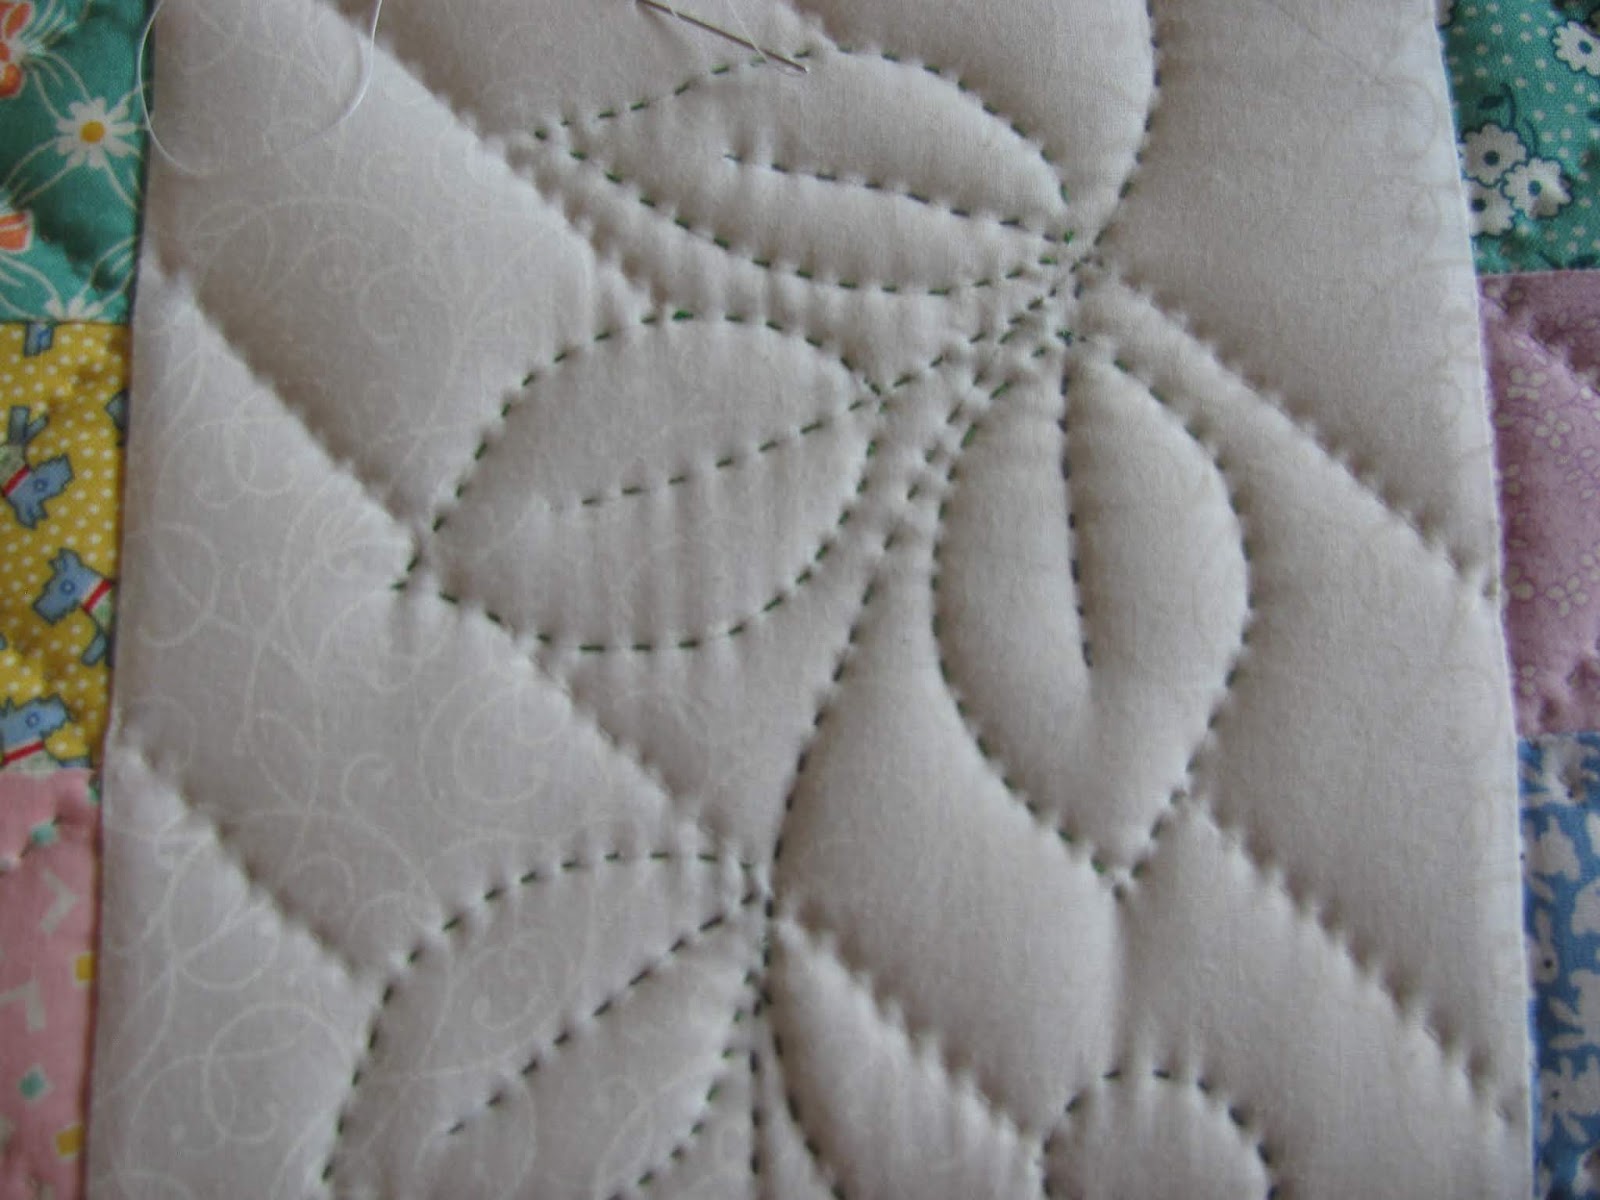
The pattern called for an applique border but I just couldn't do one more bit of applique for this quilt. Instead I chose to add a white border with a vine/leaf/flower stencil design. 


I will be quilting the design with #12 Sulky colored threads, hopefully it will show nicely. I did toss the idea around of embroidering the design in the border. 

An embroidered border would have been lovely, but I just couldn't stand the thought of wadding the quilt up in my lap while embroidering. If only I had though of it before I added the outside borders, no way I was going to take them off now.


On the center of the quilt, I marked 1/2" away from the diagonal seam lines on both sides. I followed this line into the white background of the applique.

On the darker fabrics I used a white Sewline chalk marker. On the light fabrics I marked with a Paper Mate Sharpwriter #2 mechanical pencil. I'm using a variegated white/silver thread for quilting the diagonal lines.

I'll be stitching in the ditch around all the applique using white YLI hand quilting thread. I will also stitch in the ditch the seamline between the rows.

In my opinion, wool batting is the way to go for hand quilting. I've always used a Hobbs Heirloom Premium wool batt, I buy them when they're on sale from Connecting Threads. During the last sale, I purchased a Hobbs Tuscany Collection wool batt. 

The problem with the heirloom premium batts is when they are folded then shoved in the plastic bag, it make bulges and pulls part of the batt out of shape. It can be a challenge to quilt those bulges. 

The Tuscany batt was folded nicely into a square and when I unfolded it, there wasn't one bulge pulled out of shape! I'm loving this batting already!

The backing is whole cloth fabric I purchased at Calico Point. That's where I buy my whole cloth backings. 

This quilt will be in the frame all autumn and most of the coming winter. I take my time when hand quilting, speed is not an option. Eventually this quilt will be gifted to one of the grandchildren when they're an adult.


* * * * *


I wrote the above post earlier in August when I got Sweet Surrender into the quilting frame.

The scrappy square border under the quilted white border is quilted diagonally. I'm not quilting the seam line between the blocks, I like the way it puffs. I also stitched in the ditch on both sides of the narrow white border and the bottom of the wider white border.

I really like how the colored thread looks in the flower border. The colored thread doesn't show up well in the picture but it does in real life.

Linking to Peacock PartyKathy's Slow Sunday Stitching, Oh Scrap, Bambi's Show & Tell MondayMonday MakingDesign Wall MondayBOM's Away, Moving It Forward, WIPs On Wednesday